


Installing Multi Point Locks
Finding a replacement
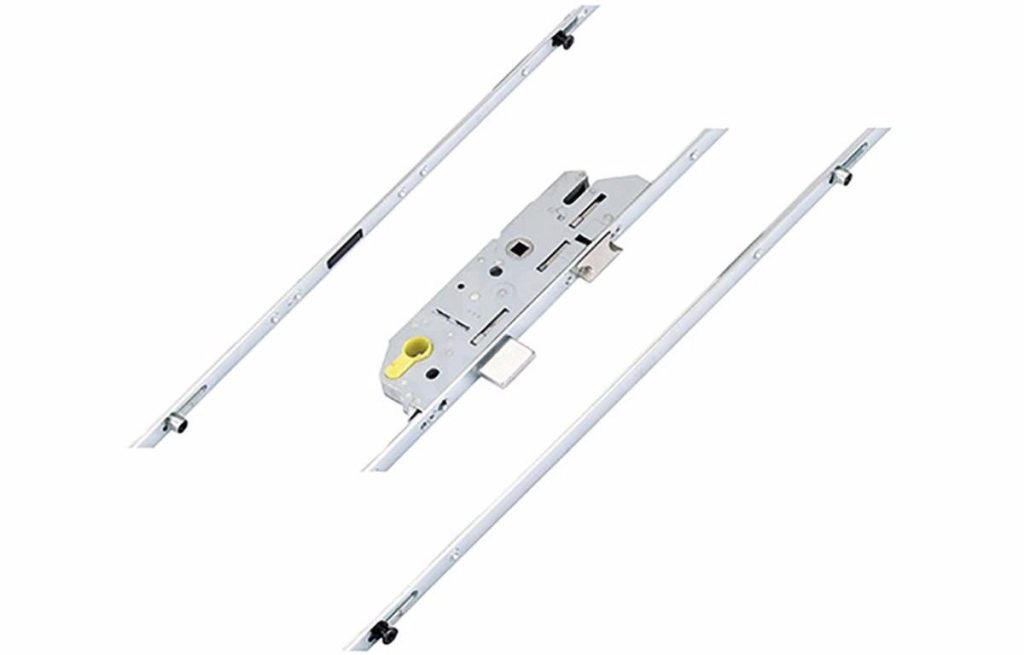
Multi point locks are the hardest to replace as there are so many variations and you need to match a number of different measurements to get the correct fit.
Backset: Distance from the edge of the lock to the centre of the euro hole.
Centres: Distance from the centre of the spindle follower to the centre of the top part of the Euro hole
You need to match the brand of the multi-point lock and the locking points.
- Find the brand name of the lock, this will be stamped on the face edge of the lock
- Check the locking points of the lock mechanism, how many rollers/hooks does the lock have?
- Measure the backset and the centers of the lockcase.
- Measure the distance between the rollers/hooks.
A lot of older Multi-point locks have been discontinued so matching the locking points can be extremely difficult. In this case you may need to alter the strike plate positions to suit the new multi-point lock.
If you can not find a direct replacement please get it touch and we'll aim to locate a suitable lock.
Installation
Step 1.
With the door open remove the screws from the face edge of the door. The screws will be long threaded screws so if you remove any short 'grub' screw replace them immediately as these hold the lock cases onto the multi-point mechanism. Remove the cylinder screw which is the long screw holding the euro cylinder in the door.
Step 2.
Remove the handles from the door by un-screwing the long bolt through fixings from the inside. Remove the Euro cylinder from the multi-point lock (see removing Euro cylinder section for instructions).
Step 3.
The whole multi-point lock should now come out of the door. The lock will be the entire length of the door so start at the top and ease the strip out first followed by the central lock case then the bottom strip.
Step 4.
With this lock out of the door you can now take the new multi-point lock from its box. Place the two locks on the floor with the old one on top of the new and line up the lock cases so they match. Make sure the euro hole and the spindle line up perfectly. With a pen/pencil mark the position where the strip on the new lock meets the old one (this will give you the correct length of the multi-point) repeat the process for the bottom strip.
Step 5.
With a hacksaw cut along the pen/pencil lines. Discard the excess metal, now you have the lock at the correct length. Replace the new lock in the door and once its fitted in (no screws fitted yet) replace the spindle, both the handles and the euro cylinder into the multi-point lock case. This will position the lock case in the correct place and now you can re-fit all the screws along the face edge of the door including the cylinder screw and the handle fixings.
Step 6.
Now the lock is fitted in the door you should be able to lift the handles and turn the key to lock the multi-point lock in place. You can tell its locked as the handles will be rigid and not press down.
Step 7.
Gentle close the door with the multi-point lock unlocked and the handles pressed down to un-throw all the bolts. If you can lift the handle up to the highest point and turn the key over then all the bolts and rollers are lining up perfectly and your done. This is unlikely as although you can often find the multi-point locks with the same centres and backset the bolts and roller are located in different positions.
Step 8.
Remove all the striking plates from your door except the middle one which takes the latch and the deadbolt. Once you have removed the plates close the door, you should hear a click as the latch is catching in line and then try to lift the handle. You can tell everything is in line as once you lift the handle you can easily turn the key. If the handle is stiff to lift or the key doesn't turn then something is not in line and you need to adjust the position of the central keep.
Step 9.
Replace each strike plate onto the door 1 at a time and keep testing the door to make sure it is working properly. Make sure each plate is working perfectly then move on and if you start to meet resistance then you know its that plate you are fitting and not the others.
Step 10.
Once you have fitted all the pates on back onto the door in the correct positions you should be able to close the door and lift the handle up with ease and then turn the key over to lock.
Multi-point locks are extremely tough if fitted correctly. Make sure every locking position is working correctly and then the door will be at its securest.